Give us a call (24/7) at
Call Basement Repair Specialists for Fast, Expert Leak Repair(855) 554-7246
A Great Job at a Great Price!®

You’ve noticed a dreaded leak in your basement and you’re wondering how to tackle it quickly and efficiently. No need to panic. From identifying the source of the leak, choosing the right tools, to sealing those pesky cracks, there’s a way to handle this. You might even find that your downspouts are to blame. But wouldn’t you like to know how to prevent it from happening again? Stick around, there’s plenty of expert advice to guide you through.
Hunting for the source of the leak in your basement might seem like searching for a needle in a haystack, but it’s often easier than you’d think.
Begin by examining the area where water seems to be most prominent. Is there a wet spot on the floor, wall, or ceiling? Wet spots can lead you directly to the source of the leak.
Next, check the outside of your house. Are there any obvious signs of water intrusion, like overflowing gutters or water pooling against the foundation? These could be contributing to your leak.
Don’t forget to inspect your windows and doors for any signs of water seepage as well.
From there, look at the plumbing. Do you see any wet pipes or dripping water? It’s possible that a pipe is leaking, causing water to seep into your basement.
Lastly, consider the humidity. If your basement is noticeably damp, the source of the leak could be condensation from high humidity levels.
A dehumidifier might be the solution in this case.
 Having identified potential sources of your basement leak, it’s equally important to understand the underlying causes. Often, leaks are due to poor or deteriorated waterproofing systems. Over time, these systems can fail, allowing water to seep into your basement.
Changes in the environment can also cause leaks. Heavy rainfall or a sudden thaw can lead to increased water pressure against your basement walls and floor. This pressure can cause cracks, through which water can enter.
Another common cause of leaks is poor drainage systems. If your gutters and downspouts aren’t directing water away from your home, it can pool around your foundation and seep into your basement.
Similarly, a slope that directs water towards your home instead of away from it can cause leaks. This is often an issue in older homes, where the land has settled over time.
Finally, leaks can be due to construction issues. Poorly sealed windows or doors, or cracks in the concrete, can allow water in.
Understanding the cause of your leak is crucial to fixing it. Once you know why water is coming in, you’ll be better equipped to stop it.
Before you can start fixing your leaky basement, you’ll need the right tools and materials for the job.
It’s crucial to gather all necessary tools and make sure you’re selecting quality materials to guarantee the job is done right.
Understanding how to use these tools properly will also make the process smoother and more effective.
You’re going to need some specific tools and materials to tackle a leaky basement.
Start by gathering a good quality flashlight to inspect the area thoroughly. You’ll also need a bucket and towels to manage the initial water leakage and keep the area as dry as possible.
A wet-dry vacuum can be incredibly useful for removing standing water, while a good dehumidifier will help to keep the moisture levels under control.
You’ll also need a sturdy ladder to reach high places and some safety gear like gloves and protective eyewear for your protection.
In terms of repair tools, a concrete sealer will be your best friend. It’s essential for patching up any cracks and leaks.
A caulking gun will also come in handy here. Additionally, a good quality paintbrush and roller will be needed to apply the sealer properly.
While amassing the right tools is undeniably important, your battle against a leaky basement won’t be won with subpar materials. Your materials, like your resolve, need to be of the highest quality.
Let’s start with waterproofing sealants. Opt for a high-quality sealant that’s specifically designed for basement waterproofing. It’ll offer superior adhesion and long-lasting protection against moisture.
Next, consider the use of a water barrier membrane. This is a thin layer of material that’s designed to prevent water from seeping into your basement. It should be durable, resistant to tears, and easy to install.
Your choice of concrete also matters. Go for a mix that’s known for its strength and durability, one that can withstand the pressure of water pushing against your basement walls.
Armed with the right materials, you’re now ready to understand how to effectively use the necessary tools for fixing a leaky basement.
First and foremost, you’ll need a good quality, heavy-duty hammer. You’ll use it to remove any existing damaged materials and to secure new ones into place.
Next, a high-grade caulk gun will be indispensable. It’s designed to control the flow of caulk, sealant, or adhesive, which you’ll use to fill any cracks or holes. Remember, a steady hand is key for a neat, effective application.
A moisture meter is another essential tool in your arsenal. It’s used to detect and measure the level of moisture in your basement walls. This will help you to identify the source of the leak and the extent of the damage.
Finally, a solid pair of safety gloves and goggles aren’t optional. They’ll protect you from debris and chemicals throughout the repair process.
Using these tools properly won’t only make the task easier, but it will also guarantee a high-quality and long-lasting repair.
Before you start fixing your leaky basement, it’s essential to prepare it adequately.
Begin by thoroughly evaluating any existing damages to understand the scope of the issue at hand.
Then, make certain you’ve got all the necessary materials collected from the previous steps, so you’re fully equipped to tackle the problem.
First off, a thorough assessment of your basement is critical to identify and understand the extent of the damage. Don’t disregard this step – it’s crucial for fixing your leaky basement fast.
Start by visually inspecting the walls and floors for any signs of water intrusion. Cracks, damp spots, and discoloration are all signs of potential leaks.
Next, check for more subtle signals of water damage. Musty odors usually indicate mold or mildew growth, often a result of hidden leaks. Peeling paint or efflorescence, a white powdery substance on walls, are signs that water is seeping into your basement.
Take note of the location and size of each crack or leak. This will help you determine the source of the water and the best way to fix it. If you notice leaks near windows or pipes, it’s likely that water is coming in from the outside. If the leaks are closer to the floor, it could be a problem with the foundation.
Lastly, don’t forget to examine your gutters and downspouts. They should be directing water away from your house. If they’re not, they could be contributing to your basement water problem.
Having a clear understanding of the damage will guide your next steps.
Once you’ve taken stock of the damage, it’s time to roll up your sleeves and gather the materials you’ll need to fix your leaky basement. Getting the right tools and supplies is imperative to a successful repair job. You don’t want to be midway through a patch-up only to realize you’re missing a key component.
First, you’ll require a quality waterproofing sealant. It’s essential to choose one specifically designed to withstand the moisture and pressure of a basement environment.
Next, a sturdy wire brush is necessary to clean the area of loose debris before applying the sealant. You’ll also need a caulking gun to apply the sealant. Try to find one with an easy grip handle and a built-in cutter to open the sealant tube. This will make your task much easier.
A putty knife is also crucial for smoothing out the sealant once applied. Consider acquiring a pair of heavy-duty gloves to protect your hands, and safety goggles to shield your eyes from potential splashes of sealant.
While you might feel daunted at the sight of wall cracks in your basement, it’s essential to know that you can fix them yourself with the right tools and techniques.
First, you’ll need to clean the crack thoroughly. Use a wire brush to remove loose debris, then vacuum the area to guarantee it’s clean and dust-free.
Next, apply a layer of hydraulic cement into the crack using a putty knife. It’s important to press the cement in firmly to make sure it fills the entire crack. Don’t worry about making it neat at this stage; the goal is to seal the crack. Let the cement dry for about an hour.
Once it’s set, you can smooth the surface with a wet sponge. This will remove any excess cement and create a seamless finish.
After the cement has fully dried, apply a waterproof masonry sealer. This will create a watertight seal, preventing further leaks.
With patience and a careful approach, you can fix wall cracks and prevent future leaks. Remember, it’s about quality work; haste can lead to mistakes that might cause more problems down the line.
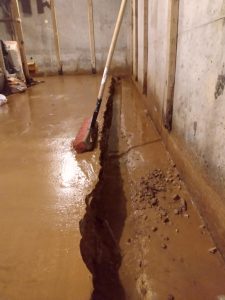
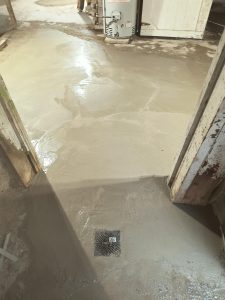
If your basement’s floor is sporting suspicious wet spots, it’s high time to address these leaks and keep your space dry.
The first step is to identify the source of the leak. This can often be done by tracing the moisture back to its origin.
Once you’ve identified the source, you’ll want to seal the leak. There are several ways to do this, but one of the most effective is using an epoxy or polyurethane sealant. These sealants are designed to penetrate the concrete, filling in the crack and creating a waterproof barrier.
Before applying the sealant, make sure the area is clean and dry. Any dirt or moisture can prevent the sealant from adhering properly.
Apply the sealant according to the manufacturer’s instructions. It’s generally a good idea to apply a second coat for extra protection.
Now, let’s shift our attention to window well leaks – another common issue in basements.
You’ll need to learn how to spot these leaks, master the techniques to repair them, and understand how to prevent them in the future.
Spotting window well leaks early can save you a lot of time and money in the long run. It’s important to know the signs before damage becomes extensive. The most obvious sign is water pooling in your window well. If you see standing water, it’s a clear indication of a problem.
Another sign is water stains or dampness on the interior of your basement walls. Pay close attention to the areas directly below your windows. If these areas are constantly wet, you’ve likely got a window well leak.
Check your windows themselves. Are they foggy, even when it’s dry outside? This could be a result of excess moisture caused by a leak.
Additionally, look for signs of mold or mildew. These are often dark, fuzzy patches that may have a strong, musty odor. If you spot any of these signs, it’s likely you have a leak.
Regularly maintaining your window wells can greatly reduce the risk of leaks. However, if you’re dealing with an existing leak, there’s no need to panic. Here’s a practical guide that’ll help you tackle the situation head-on.
First off, you’ll need to locate the source of the leak. Is water seeping in around the window frame or through cracks in the well? Once you’ve identified this, you’re ready to move onto the repair stage.
If the leak is around the window frame, you’ll want to re-caulk it. This involves removing the old, ineffective caulk and applying a fresh layer. It’s a simple task that you can handle yourself with a caulking gun and a tube of high-quality, waterproof caulk.
For leaks through cracks in the window well, a polyurethane sealant is your best friend. Apply it directly to the crack, making sure it’s completely filled.
Remember, it’s crucial to let the sealant dry fully before exposing it to any water.
Don’t forget, if the repairs seem too intimidating or the damage too extensive, it’s always best to call in a professional. They’ve got the expertise to guarantee your basement stays dry.
Keeping your basement dry is an achievable goal with some effective preventive measures. One common culprit for basement leaks are window wells. When not properly maintained, they can funnel water right into your basement.
To prevent window well leaks, you’ll first need to check for any visible damage. Damaged or rusted window wells may need to be replaced. Examine the drain in the well; it should be free of debris to allow for proper water flow. If it’s blocked, you’ll need to clean it out.
Another important step is to guarantee correct installation of window well covers. These covers prevent water, leaves, and other debris from accumulating in the well. Make sure they’re securely fastened and intact – a cracked or broken cover won’t offer much protection.
Lastly, consider the ground slope around your house. The earth should slope away from your home, directing water away from your foundation. If it’s sloping towards your home, you may need to regrade your landscape.
Preventing basement leaks isn’t a one-time task. It requires consistent effort and regular checks. But with these measures, you can stop leaks before they start and keep your basement dry.
Before you find yourself knee-deep in water, it’s crucial to take some preventative measures to keep your basement dry. Start by inspecting your home’s exterior. Verify your gutters are clean and functioning properly, directing water away from your home’s foundation.
Additionally, check that your downspouts extend at least six feet away from your house to prevent pooling around the base.
Next, take a look at your landscaping. Slope the soil away from your home to discourage water from seeping into your basement. If you’re living in an area with a high water table, consider installing a French drain system. This can divert groundwater away from your foundation effectively.
Inside your basement, seal cracks or gaps in walls and floors using a waterproof sealant. Also, consider using a dehumidifier to manage humidity levels, deterring mold growth and extra moisture.
Lastly, regular maintenance is key. Perform these checks seasonally, especially before periods of heavy rainfall.
 Steering through the world of home repairs can often feel like an intimidating task.
You’re skilled and you’ve successfully handled minor issues, but remember, not all problems are DIY friendly. There are instances when it’s crucial to call a professional, especially when dealing with a leaky basement.
Repeated leaks, despite your best efforts, signal a more serious, potentially structural issue. In such cases, you’ll benefit from a professional’s experienced eye. They’ve the knowledge and tools to diagnose hidden problems that you might overlook.
Water pooling or seeping up from the floor is another red flag. This usually signifies a problem with the foundation or water table, well beyond most homeowners’ fix-it abilities.
If you’ve noticed mold or mildew growth, it’s also time to call in the professionals. These issues can lead to serious health problems and require specialized treatment.
In the battle against a damp basement, a proactive approach is your best weapon. Don’t wait for a leakage problem to escalate; it’s time to roll up your sleeves and take action.
First, it’s crucial to verify that your home’s drainage system is functioning properly. Regularly clean the gutters and downspouts, and make sure they’re directing water away from your home. It’s a simple task, but it can save you from major headaches down the line.
Next, inspect your basement regularly for signs of moisture. If you spot any damp spots or water seeping in, address the issue immediately.
You can use a dehumidifier to reduce the moisture level in your basement. This device can be a game-changer in maintaining a dry basement.
In summary, don’t underestimate the impact of a leaky basement. It’s more than just an inconvenience; it can lead to serious damage. A staggering 98% of basements in the U.S experience some type of water damage. So, it’s essential to act swiftly, employing the right tools and methods. And remember, if the issue persists, don’t hesitate to call in a pro. They can help safeguard your home against future leaks, ensuring a dry and safe basement.

Tom Trinko is the dedicated owner of Basement Repair Specialists, a company renowned for its expert solutions in basement and foundation repairs. With a strong commitment to excellence and customer satisfaction, Tom has led his team to become one of the leading providers in the industry. Under his guidance, Basement Repair Specialists have developed a reputation for their reliability, innovative repair techniques, and exceptional service. Tom’s leadership is defined by his vast industry knowledge, customer-first approach, and a steadfast dedication to providing homeowners with cost-effective, durable solutions for their basement and foundation needs. For more information about Tom Trinko and the services offered by Basement Repair Specialists, visit their website at https://basementrepairspecialists.com/.
Contact the Professionals at Basement Repair Specialists, LLC Today! (855) 554-7246